安田です。はてなブログ初投稿です。 この記事は、NEXTSCAPE Advent Calendar 2021 の 4 日目 の記事です
目的
.NET5でWPFアプリを作成し、簡易的なリーディングルーラー作ります。
完成イメージはこちらです。
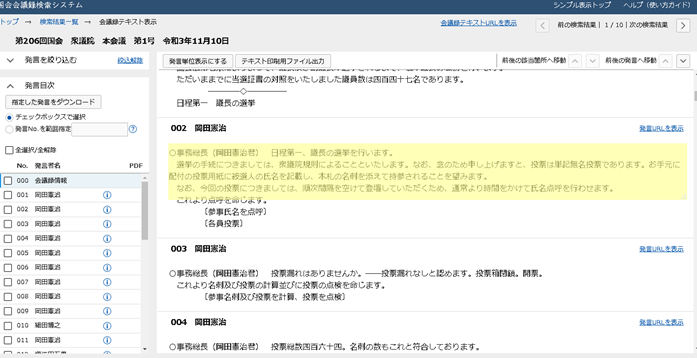 適当な国会議事録の上で使用しています。若干読みやすくなったような気がしないでもないです。
見た目としては以下の仕様とします。 * ウィンドウタイトルを削除して枠組みを消す * 透過表示を可能にする * タスクバーには表示しない。 * タスクトレイアイコンから終了する事ができる。 * 大きさの変更、ドラッグで移動が可能とする。
学べる事
.NET5でWPFアプリを作成する方法、WPFアプリからWin32APIを使う方法を学べます。
前提条件
- OS : Windows10 Enterprise バージョン21H2 を使用してますが、VSCodeが動けば大体なんでもいいです。
- 開発環境 : VSCode(1.62.3)を使用していますが、バージョンは大体何でもいいです。C#の拡張機能を入れておく必要があります。
- 言語など : .NET5 5.0.201でC#で開発します。特にバージョンに依存しそうな物も使ってないので、他でも動くと思います。
VSCodeの使い方など基本的な事は省略します。
デバッグできるようにするまで
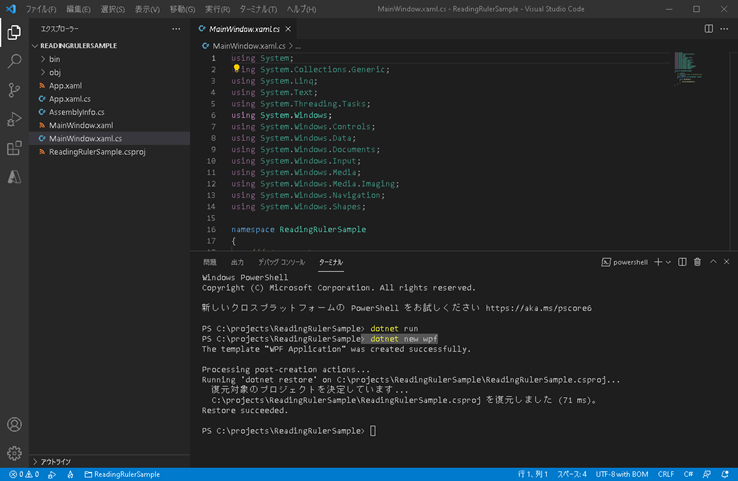
適当なディレクトリを作り、dotnet new コマンドで、wpfのアプリを作成します。> dotnet new wpf The template "Windows Forms App" was created successfully.
Processing post-creation actions... Running 'dotnet restore' on C:\projects\ReadingRulerSample\ReadingRulerSample.csproj... 復元対象のプロジェクトを決定しています... C:\projects\ReadingRulerSample\ReadingRulerSample.csproj を復元しました (52 ms)。 Restore succeeded
この状態でディレクトリをVSCodeで開いた所です。
MainWindow.xaml.cs を開いています。
 ※ ReadingRulerSample.csproj の名前はディレクトリ名に従うため、ディレクトリ名が異なる方は読み替えてください。
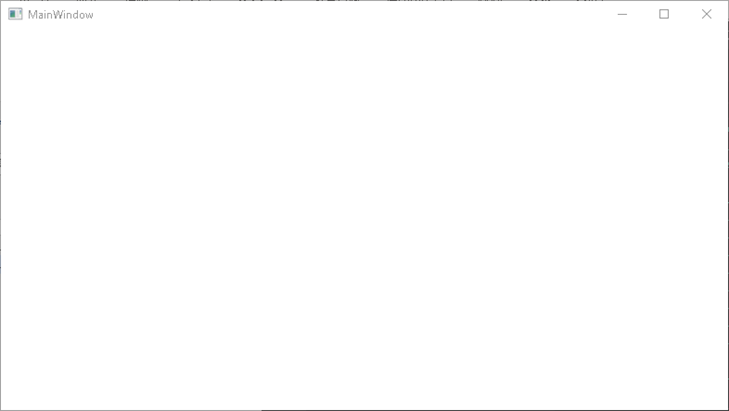
一旦実行して、フォームが表示される事を確認します。 ターミナルから以下のコマンドを実行します。
> dotnet run
以下のようにフォームが表示される事を確認します。確認したらフォームを閉じて下さい。
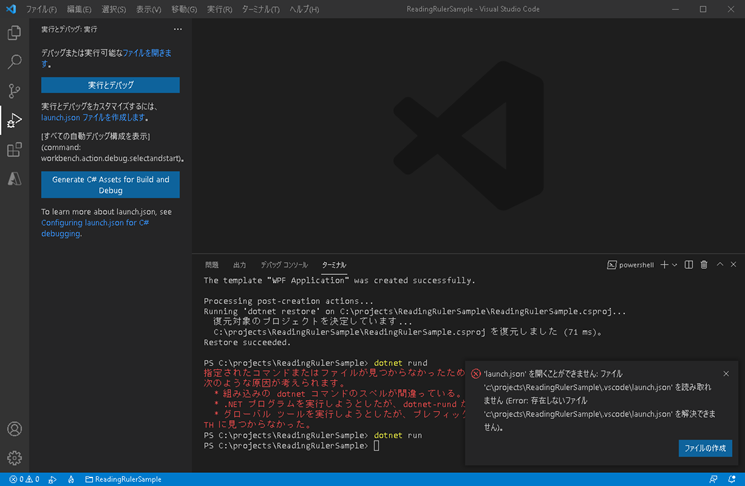
デバッグの設定を行います。VSCodeの左側のアイコンから「実行とデバッグ(Ctrl+Shift+D)」を選択します。
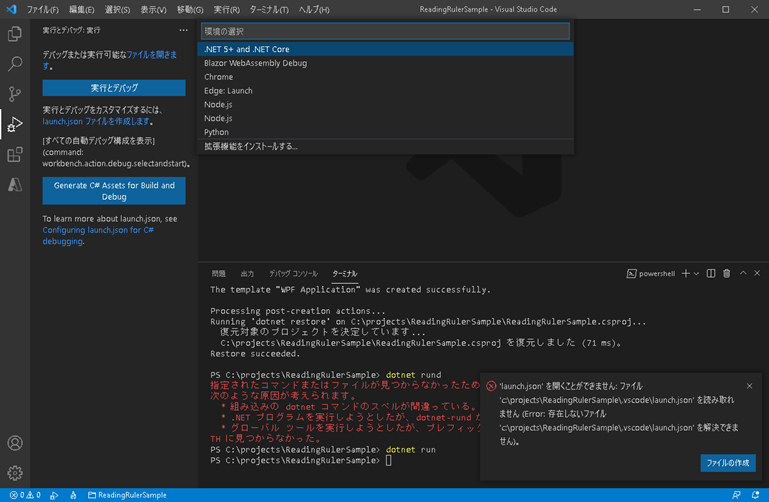
右下の方に「'launch.json'を開くことができません」というエラーが出ますが、正常です。
 「launch.jsonファイルを作成します」をクリックし、「.NET 5+ and .NET Core」を選択します。この辺りの選択肢は環境によって変化するので、それっぽいの選んで下さい。間違えたらlaunch.jsonを消してやり直せば大丈夫です。
 デバッグを実行して、フォームが表示されたら準備は完了です。
アイコンを準備する(省略可)
作りの都合上、アイコンがあった方が便利なので強く推奨します。
商用利用が可能なここら辺で適当なのを落としてきます。
ファイル名を「app.ico」としてルートディレクトリに保存します。 ReadingRulerSample.csproj を開きます。
※このファイル名は dotnet new を実行した時のディレクトリ名に左右されるので、適度に読み替えて下さい。
UseWPF タグの後ろに UseWindowsForms タグを追加します。 PropertyGroup タグの後ろに ItemGroup タグを追加します。 結果として以下のようになるよう修正してください。
<Project Sdk="Microsoft.NET.Sdk">

  <PropertyGroup>
    <OutputType>WinExe</OutputType>
    <TargetFramework>net5.0-windows</TargetFramework>
    <UseWPF>true</UseWPF>
    <UseWindowsForms>true</UseWindowsForms>
  </PropertyGroup>
  <ItemGroup>
    <None Update="app.ico">
      <CopyToOutputDirectory>PreserveNewest</CopyToOutputDirectory>
    </None>
  </ItemGroup>
</Project>
CopyToOutputDirectory タグは、ファイルの上書き条件です。Alwaysでも動作しますが、厳密にはパフォーマンスの観点からPreserveNewestが推奨なようです。 この時点での ReadingRulerSample.csproj は、以下の画像のようになっているはずです。
これで、ビルドした時にapp.icoというファイルが実行ディレクトリにコピーされます。しかし、このままではアプリがアイコンを使用してくれません。ソースを修正します。
MainWindow.xaml.cs を開きます。
usingの記述場所に 「using System.Windows.Forms;」を追加します。usingは以下のようになるはずです。順番は前後して構いません。
using System;
using System.Collections.Generic;
using System.Linq;
using System.Text;
using System.Threading.Tasks;
using System.Windows;
using System.Windows.Controls;
using System.Windows.Data;
using System.Windows.Documents;
using System.Windows.Forms;
using System.Windows.Input;
using System.Windows.Media;
using System.Windows.Media.Imaging;
using System.Windows.Navigation;
using System.Windows.Shapes;
※この時点で、 using System.Windows.Forms; の所にエラーが表示されている場合、 ReadingRulerSample.csproj に UseWindowsForms タグの設定が無いと思われます。再度確認してください。
アイコンを表すフィールドを作ります。 「public MainWindow()」の手前に以下のコードを入れて下さい。
/// <summary>
/// タスクトレイのアイコン
/// </summary>
private NotifyIcon _notifyIcon;
アイコンファイルの読み込みと、タスクトレイの表示を実装します。 「InitializeComponent();」の後に以下のソースを入れて下さい。
//タスクトレイアイコンを初期化する
_notifyIcon = new NotifyIcon();
_notifyIcon.Text = "リーディングルーラーサンプル";
_notifyIcon.Icon = new System.Drawing.Icon("app.ico");
//タスクトレイに表示する
_notifyIcon.Visible = true;
この時点での MainWindow.xaml.cs は以下のようになるはずです。
using System;
using System.Collections.Generic;
using System.Linq;
using System.Text;
using System.Threading.Tasks;
using System.Windows;
using System.Windows.Controls;
using System.Windows.Data;
using System.Windows.Documents;
using System.Windows.Forms;
using System.Windows.Input;
using System.Windows.Media;
using System.Windows.Media.Imaging;
using System.Windows.Navigation;
using System.Windows.Shapes;

namespace ReadingRulerSample
{
    /// <summary>
    /// Interaction logic for MainWindow.xaml
    /// </summary>
    public partial class MainWindow : Window
    {
        /// <summary>
        /// タスクトレイのアイコン
        /// </summary>
        private NotifyIcon _notifyIcon;

        public MainWindow()
        {
            InitializeComponent();

            //タスクトレイアイコンを初期化する
            _notifyIcon = new NotifyIcon();
            _notifyIcon.Text = "リーディングルーラーサンプル";
            _notifyIcon.Icon = new System.Drawing.Icon("app.ico");
            //タスクトレイに表示する
            _notifyIcon.Visible = true;
        }
    }
}
この状態で実行してみましょう。タスクトレイにアイコンが表示されるはずです。 以下はタスクトレイの例です。一番左の定規っぽいアイコンが使用しているアイコンです。アイコンのファイルを指定しなかった場合には空のアイコンが表示されるはずです。
イベントハンドラとヘルパーを追加する クリックイベントなどのイベントハンドラを定義し、WPFとWin32APIの相互運用してくれるヘルパーを追加します。 usingに System.Runtime.InteropServices; を追加します。
using System.Runtime.InteropServices;
イベント関連のフィールドを定義します 「private NotifyIcon _notifyIcon;」と「public MainWindow()」の間に以下のソースを記述します。
#region win32api関連
private const int WM_NCLBUTTONDOWN = 0xA1;
private const int HT_CAPTION = 0x2;

[DllImport("user32.dll", CharSet = CharSet.Auto)]
private static extern IntPtr SendMessage(
    IntPtr hWnd, int Msg, IntPtr wParam, IntPtr lParam);
[DllImportAttribute("user32.dll")]
private static extern bool ReleaseCapture();
/// <summary>
/// WPFとWin32の相互運用ヘルパー
/// </summary>
private System.Windows.Interop.WindowInteropHelper windowInteropHelper;
#endregion
タスクトレイを右クリックして終了できるようにする
イベントハンドラ用のメソッドを定義します。 MainWindow メソッドの後ろに以下のソースを追記します。
/// <summary>
/// タスクトレイアイコンのクリックのイベントハンドラ
/// </summary>
/// <param name="sender"></param>
/// <param name="e"></param>
private void _notifyIcon_MouseClick(object sender, System.Windows.Forms.MouseEventArgs e)
{
    try
    {
        if (e.Button == MouseButtons.Left)
        {
            //ウィンドウを可視化
            Visibility = System.Windows.Visibility.Visible;
            WindowState = System.Windows.WindowState.Normal;
        }
    }
    catch { }
}

/// <summary>
/// 終了メニューのイベントハンドラ
/// </summary>
/// <param name="sender"></param>
/// <param name="e"></param>
private void exitItem_Click(object sender, EventArgs e)
{
    try
    {
        _notifyIcon.Dispose();
        System.Windows.Application.Current.Shutdown();
    }
    catch { }
}
イベントハンドラにメソッドを設定します。 MainWindowメソッドの「_notifyIcon.Visible = true;」の後ろに以下のソースを挿入します。
//アイコンにコンテキストメニュー「終了」を追加する
ContextMenuStrip menuStrip = new ContextMenuStrip();
ToolStripMenuItem exitItem = new ToolStripMenuItem();
exitItem.Text = "終了";
menuStrip.Items.Add(exitItem);
exitItem.Click += new EventHandler(exitItem_Click);

_notifyIcon.ContextMenuStrip = menuStrip;

//タスクトレイアイコンのクリックイベントハンドラを登録する
_notifyIcon.MouseClick += new System.Windows.Forms.MouseEventHandler(_notifyIcon_MouseClick);
※ここまでの MainWindow.xaml.cs を記載しようかと思ったのですが、長くなるので省略します。 ※System.Windows.Forms.MouseEventArgs 等が完全修飾名なのは曖昧さの回避のためです。 実効してみましょう。タスクトレイのアイコンを右クリックすると「終了」が表示され、クリックすると終了するはずです。
見た目を整える
アプリケーションの設定
ウィンドウ枠の削除、透過処理の有効化、タスクバーの非表示、常に最前面 XMLファイルの設定で行います。ソースからでも可能なようですが、XMLファイルを触らないというのも勿体ないのでこちらで設定します。 「MainWindow.xaml」を開きます。以下のようになっているはずです。
<Window x:Class="ReadingRulerSample.MainWindow"
    xmlns="http://schemas.microsoft.com/winfx/2006/xaml/presentation"
    xmlns:x="http://schemas.microsoft.com/winfx/2006/xaml"
    xmlns:d="http://schemas.microsoft.com/expression/blend/2008"
    xmlns:mc="http://schemas.openxmlformats.org/markup-compatibility/2006"
    xmlns:local="clr-namespace:ReadingRulerSample"
    mc:Ignorable="d"
    Title="MainWindow" Height="450" Width="800">
    <Grid>

    </Grid>
</Window>
Gridタグは無い可能性があります。不要ですので削除してください。 「mc:Ignorable="d"」の後ろに以下の4行を追加します。
WindowStyle="None"
AllowsTransparency="true"
ShowInTaskbar="False"
Topmost="True"
結果は以下のようになります。
<Window x:Class="ReadingRulerSample.MainWindow"
        xmlns="http://schemas.microsoft.com/winfx/2006/xaml/presentation"
        xmlns:x="http://schemas.microsoft.com/winfx/2006/xaml"
        xmlns:d="http://schemas.microsoft.com/expression/blend/2008"
        xmlns:mc="http://schemas.openxmlformats.org/markup-compatibility/2006"
        xmlns:local="clr-namespace:ReadingRulerSample"
        mc:Ignorable="d"
        WindowStyle="None"
        AllowsTransparency="true"
        ShowInTaskbar="False"
        Topmost="True"
        Title="MainWindow" Height="450" Width="800">
</Window>
「MainWindow.xaml」を閉じて下さい。 色や透明度を調整します。 MainWindow.xaml.cs」を開きます。 先ほどの _notifyIcon.MouseClick +=(中略)の後ろに以下のソースを追加します。
//見た目を整える
this.Opacity = 0.6;
this.Background = new SolidColorBrush(Color.FromRgb(0xFF,0xFF,0x88));
大きさの変更と移動を可能にする
今回のアプリでは、ウィンドウの枠を消してしまうため、タイトルバーを使用した移動ができなくなります。そのため、ウィンドウのMouseDownイベントからタイトルバーを押されたと認識させて、移動を可能にします。 以下のメソッドを追加します。
/// <summary>
/// MouseDownイベントハンドラ
/// </summary>
/// <param name="sender"></param>
/// <param name="e"></param>
private void Window_MouseDown(object sender,
System.Windows.Input.MouseButtonEventArgs e)
{
    if (e.LeftButton == MouseButtonState.Pressed)
    {
        //マウスのキャプチャを解除
        ReleaseCapture();
        //タイトルバーでマウスの左ボタンが押されたことにする
        SendMessage(windowInteropHelper.Handle, WM_NCLBUTTONDOWN, (IntPtr)HT_CAPTION, IntPtr.Zero);
    }
}
MainWindowメソッド内、「this.Background = brush;」の後ろに以下のソースを追加します。
//大きさを変更できるように
this.ResizeMode = ResizeMode.CanResizeWithGrip;
//移動できるように
windowInteropHelper = new System.Windows.Interop.WindowInteropHelper(this);
this.MouseDown += new System.Windows.Input.MouseButtonEventHandler(Window_MouseDown);
実行してみましょう。大きさの変更が出来る事、ドラッグで移動ができる事を確認してください。
この時点のソース
ここまでの手順を正確にこなしていれば、MainWindow.xaml.csは以下のようなソースになっているはずです。確認用に記しておきます。
using System;
using System.Collections.Generic;
using System.Linq;
using System.Runtime.InteropServices;
using System.Text;
using System.Threading.Tasks;
using System.Windows;
using System.Windows.Controls;
using System.Windows.Data;
using System.Windows.Documents;
using System.Windows.Forms;
using System.Windows.Input;
using System.Windows.Media;
using System.Windows.Media.Imaging;
using System.Windows.Navigation;
using System.Windows.Shapes;

namespace ReadingRulerSample
{
    /// <summary>
    /// Interaction logic for MainWindow.xaml
    /// </summary>
    public partial class MainWindow : Window
    {
        /// <summary>
        /// タスクトレイのアイコン
        /// </summary>
        private NotifyIcon _notifyIcon;

       #region win32api関連
        private const int WM_NCLBUTTONDOWN = 0xA1;
        private const int HT_CAPTION = 0x2;

        [DllImport("user32.dll", CharSet = CharSet.Auto)]
        private static extern IntPtr SendMessage(
            IntPtr hWnd, int Msg, IntPtr wParam, IntPtr lParam);
        [DllImportAttribute("user32.dll")]
        private static extern bool ReleaseCapture();
        /// <summary>
        /// WPFとWin32の相互運用ヘルパー
        /// </summary>
        private System.Windows.Interop.WindowInteropHelper windowInteropHelper;

       #endregion

        public MainWindow()
        {
            InitializeComponent();

            //タスクトレイアイコンを初期化する
            _notifyIcon = new NotifyIcon();
            _notifyIcon.Text = "リーディングルーラーサンプル";
            _notifyIcon.Icon = new System.Drawing.Icon("app.ico");
            //タスクトレイに表示する
            _notifyIcon.Visible = true;

            //アイコンにコンテキストメニュー「終了」を追加する
            ContextMenuStrip menuStrip = new ContextMenuStrip();
            ToolStripMenuItem exitItem = new ToolStripMenuItem();
            exitItem.Text = "終了";
            menuStrip.Items.Add(exitItem);
            exitItem.Click += new EventHandler(exitItem_Click);

            _notifyIcon.ContextMenuStrip = menuStrip;

            //タスクトレイアイコンのクリックイベントハンドラを登録する
            _notifyIcon.MouseClick += new System.Windows.Forms.MouseEventHandler(_notifyIcon_MouseClick);

            //見た目を整える
            this.Opacity = 0.6;
            this.Background = new SolidColorBrush(Color.FromRgb(0xFF,0xFF,0x88));

            //大きさを変更できるように
            this.ResizeMode = ResizeMode.CanResizeWithGrip;
            //移動できるように
            windowInteropHelper = new System.Windows.Interop.WindowInteropHelper(this);
            this.MouseDown += new System.Windows.Input.MouseButtonEventHandler(Window_MouseDown);
        }

        /// <summary>
        /// MouseDownイベントハンドラ
        /// </summary>
        /// <param name="sender"></param>
        /// <param name="e"></param>
        private void Window_MouseDown(object sender,
            System.Windows.Input.MouseButtonEventArgs e)
        {
            if (e.LeftButton == MouseButtonState.Pressed)
            {
             //マウスのキャプチャを解除
             ReleaseCapture();
             //タイトルバーでマウスの左ボタンが押されたことにする
             SendMessage(windowInteropHelper.Handle, WM_NCLBUTTONDOWN, (IntPtr)HT_CAPTION, IntPtr.Zero);
            }
        }

        /// <summary>
        /// タスクトレイアイコンのクリックのイベントハンドラ
        /// </summary>
        /// <param name="sender"></param>
        /// <param name="e"></param>
        private void _notifyIcon_MouseClick(object sender, System.Windows.Forms.MouseEventArgs e)
        {
            try
            {
             if (e.Button == MouseButtons.Left)
             {
                //ウィンドウを可視化
                Visibility = System.Windows.Visibility.Visible;
                WindowState = System.Windows.WindowState.Normal;
             }
            }
            catch { }
        }

        /// <summary>
        /// 終了メニューのイベントハンドラ
        /// </summary>
        /// <param name="sender"></param>
        /// <param name="e"></param>
        private void exitItem_Click(object sender, EventArgs e)
        {
            try
            {
             _notifyIcon.Dispose();
             System.Windows.Application.Current.Shutdown();
            }
            catch { }
        }
    }
}
こだわった所
ウィンドウの移動を自分で作成しようと試みたのですが、カクカクしてしまいうまくいかず、やむを得ずタイトルバーでの移動を利用しました。もっといい案があったら教えて欲しいです。
作った理由
ある保険のCMで、読字障害を持つ熟年の教師を紹介していたのがあまりにも衝撃的でした。定規を使って一行ずつ読み仕事をしているのですが、恐らくは学生時代から数十年この作業を繰り返しているのです。ここに辿り着くまで気が遠くなるような努力があったのでしょう。とても自分には真似できませんが、多少なりとも何かしないと世間様に申し訳ないと思った次第です。世の中、すごい奴がいるもんだ。 このアプリの出来栄えにはそんなに自信が無いのですが、いつかもっと良いものを誰かが作ってくれるでしょう。 ちなみにKindlleのアプリには定規という似たような機能が備わっています。